1. 刪去日文的設定
2. 設定 mpd 的 configure 檔
3. 設定 NAS 的 file sharing mapping (在 rc.local 內)
4. 把系統會寫的file 移至 RAM drive 上 (廷長 micro SD 的壽命)
1. 刪去日文的設定
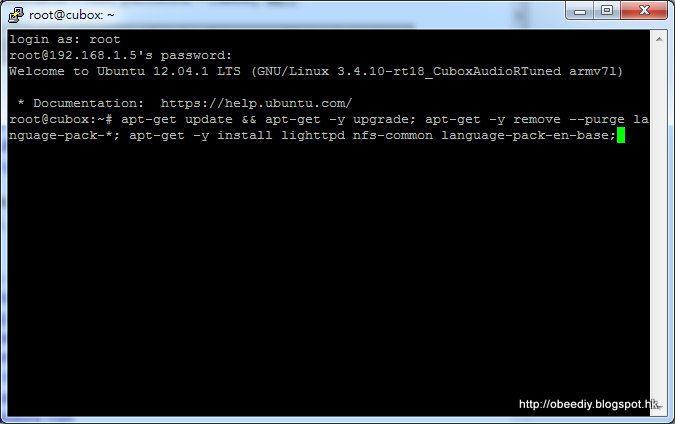
開了機, SSH 入去後 (username = root, password = cubox), 執行:
apt-get update && apt-get -y upgrade; apt-get -y remove --purge language-pack-*; apt-get -y install lighttpd language-pack-en-base;


dpkg-reconfigure locales; export LANG=en_HK.UTF-8; dpkg-reconfigure tzdata; apt-get update && apt-get -y upgrade; echo "export LANG=en_HK.UTF-8;" >> /root/.profile; apt-get -y autoremove; reboot
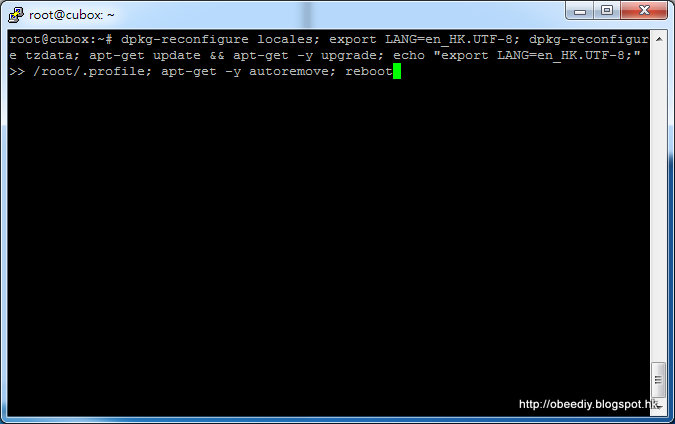
它會問你當前的 Locale, 只要選 "Asia", "Hong Kong" 便可.


到了最後它會自己 reboot. Reboot 後又 SSH 登入. 再執行:
echo "alias ls='ls -la --color=auto'" >> /root/.profile;2. 設定 mpd 的 configure 檔
cd /var; mv /var/log /run
ln -s ../run/log log
cd /var/lib; mv /var/lib/urandom /run
ln -s /run/urandom /var/lib/urandom
mv /var/lib/dhcp /run
ln -s /run/dhcp /var/lib/dhcp
mv /root/.bash_history /run
ln -s /run/.bash_history /root/.bash_history
mkdir -p /run/music
ln -s /run/music /music
ln -s /music /var/www/music
執行:
mv /etc/mpd.conf /etc/mpd.conf.org(nano 的簡單教學: [轉] 基本 Nano 指南)
nano /etc/mpd.conf
Copy & Paste 以下內容 (可用 mouse highlight 下面藍色的字,再按 ctrl-C, 然後把 滑老放標放在 putty 的 nano 內按 right click)
music_directory "/music"請自行修改粉紅色的內容, 其中,
playlist_directory "/music/.mpdConf/playlists"
db_file "/music/.mpdConf/cubox/db"
log_file "/run/mpd/log"
pid_file "/run/mpd/pid"
state_file "/music/.mpdConf/cubox/state"
sticker_file "/music/.mpdConf/cubox/sticker.sql"
audio_buffer_size "8192"
buffer_before_play "90%"
user "mpd"
group "audio"
zeroconf_enabled "yes"
zeroconf_name "Cubox"
mixer_type "disabled"
filesystem_charset "UTF-8"
id3v1_encoding "UTF-8"
realtime_option {
memlock "yes"
stack_reserve "2048"
heap_reserve "10240"
main_priority "OTHER:0"
player_priority "FIFO:52"
decoder_priority "FIFO:51"
update_priority "OTHER:0"
}
decoder {
plugin "dsdiff"
enabled "yes" # DSD native
}
decoder {
plugin "dsdiff_native"
enabled "yes"
dsdsampleformat "24"
tagsupport "id3pref"
}
# An example of an ALSA output:
#
audio_output {
type "alsa"
name "My ALSA Device"
device "hw:0,0" # optional
priority "FIFO:52"
dsd_usb "yes"
}
- "My ALSA Device" 是你的DAC在MPaD上顯示的名稱
離開 nano 之後執行:
chown mpd:audio /etc/mpd.conf
3. 設定 NAS 的 file sharing mapping
(nano 的簡單教學: [轉] 基本 Nano 指南)
nano -w /etc/rc.local
清除原來的內容, 然後 Copy & Paste 以下內容 (可用 mouse highlight 下面藍色的字,再按 ctrl-C, 然後把 滑老放標放在 putty 的 nano 內按 right click)
#!/bin/sh -e
#
# rc.local
#
# This script is executed at the end of each multiuser runlevel.
# Make sure that the script will "exit 0" on success or any other
# value on error.
#
# In order to enable or disable this script just change the execution
# bits.
#
# By default this script does nothing.
chrt -f -p 53 `pgrep -n cifsd`
chrt -f -p 53 `pgrep -o cifsd`
mount -t cifs -o uid=mpd,file_mode=0666,dir_mode=0766,iocharset=utf8,\請自行修改粉紅色的內容, 其中,
rsize=130048,wsize=4096,\
username=mpduser,password=mpd1234 192.168.0.101:/Music /run/music
service mpd restart
mpc update
find /run/music/USB -type d -empty -delete
exit 0
- mpduser 是你打 NAS 上的 music folder 分享的用戶名稱,
- mpd1234 是你打 NAS 上的 music folder 分享的用戶密碼,
- 192.168.0.101:/Music 是你打 NAS 上的 music folder 分享的link,

按下 Ctrl+O。再按下 Ctrl+X 離開 nano
4. 把系統會寫的file 移至 RAM drive 上
執行:
nano /etc/init.d/readonlySetup(nano 的簡單教學: [轉] 基本 Nano 指南)
貼上以下
#!/bin/sh
### BEGIN INIT INFO
# Provides: read-only file-system preparation
# Required-Start: $remote_fs $syslog
# Required-Stop: $remote_fs $syslog
# Default-Start: 2 3 4 5
# Default-Stop: 0 1 6
# Short-Description: prepare for read-only root FS
# Description: prepare for read-only root FS
### END INIT INFO
prep_start () {
echo "Prep for read-only FS"
echo heartbeat > /sys/class/leds/cubox:red:health/trigger
/bin/mkdir -p /run/log/lighttpd /run/tmp /run/urandom /run/dhcp /run/music/.mpdConf/cubox /run/music/.mpdConf/playlists
/bin/touch /run/.bash_history /run/music/.mpdConf/cubox/db /run/music/.mpdConf/cubox/state /run/music/.mpdConf/cubox/sticker.sql
/bin/chmod -R 777 /run/log /run/tmp /run/urandom /run/dhcp /run/music
#/bin/mount -o remount,ro /
}
prep_stop () {
echo "Prep for read-only FS (stop)"
/bin/mount -o remount,rw /
}
case "$1" in
start)
prep_start
;;
stop)
prep_stop
;;
*)
echo "Usage: $0 {start|stop}"
exit 2
;;
esac

按下 Ctrl+O。再按下 Ctrl+X 離開 nano
離開 nano 之後執行:
chmod 777 /etc/init.d/readonlySetupReboot 後, 你可用 MPaD (或任何 mpd controller) 見到 "Cubox".
cd /etc/rc2.d
ln -s ../init.d/readonlySetup S10readonlySetup
cd ..
cd /etc/rc3.d
ln -s ../init.d/readonlySetup S10readonlySetup
cd ..
cd /etc/rc4.d
ln -s ../init.d/readonlySetup S10readonlySetup
cd ..
cd /etc/rc5.d
ln -s ../init.d/readonlySetup S10readonlySetup
reboot
設定完成!
No comments:
Post a Comment